In 10 episodes we show how to code an app for PLCnext Technology and deploy it via the PLCnext Store. Peek into the coder’s diary where he tells all about building the “MQTT on paho” app that’s already available at the PLCnext Store.
All code examples to these instructions are available at GitHub.
Schedule for 10 days of coding
Already online:
- Day 1: Project brief: introduction to MQTT and the MQTT client for PLCnext Control devices
- Day 2: Building and testing the Eclipse paho MQTT client libraries for PLCnext Control devices
- Day 3: Creating a PLCnext Technology Function Extension component
- Day 4: Converting a PLM component into an ACF component (and why this is useful)
- Day 5: Defining and publishing an RSC Service
- Day 6: Understanding the use of a Singleton pattern and wrapping up the MQTT Client
- Day 7: Creating a Remote Service Call client that connects our MQTT client to the GDS
- Day 8: Adding a Worker Thread for cyclic execution
- Day 9: Making the component user-configurable by JSON settings
- Day 10: Packaging the Function Extension as a PLCnext Store App and deploying
A playlist with all videos in one frame is available here.
Day-by-day videos
On Day 1, we look a bit deeper into the MQTT protocol and how it would fit into the PLCnext Technology system architecture. This is important to find the best kind of component to program for our C++ application because each of the three kinds has its advantages for different purposes. After that we consider how to use the Eclipse paho MQTT client as an open source library for our application.
On Day 2, we pull the open source code of the Eclipse™ paho project from its GitHub repository to our host machine running on Linux Debian. We will do that for both the C and C++ library, as explained on Day 1.
For that we set up a task in Visual Studio Code, so we can later on build the app for different target controllers. After that, we check that the code is working fine on our PLC by deploying a sample application from the paho library to our PLC and running it with the public MQTT broker at mosquitto.org.
On Day 3, we create a Function Extension component for PLCnext Technology based on the paho MQTT client we pulled from the Eclipse paho project’s GitHub repository on Day 2. To do that, we use a template installed by the PLCnext CLI that’s part of the toolchain provided by Phoenix Contact free of charge. The PLCnext CLI will create the C++ code for our PLCnext component, and after that, all the intermediate and configuration files for this project.
But from here on we proceed without the help of the PLCnext CLI and set up a task in Visual Studio Code to deploy the code to the PLC manually, start the component in the Shared Object library and create the Automation Component Framework (ACF) config file. Finally, we check our code with a simple debug message.
On Day 4, we convert the PLM component that was generated by the PLCnext CLI by default to a pure Automation Component Framework (ACF) component that doesn’t depend on the real-time context. It’s also a nice way to revisit and distinguish the different types of C++ programs for the PLCnext Runtime System that are explained in the preliminary video. For that we strip our code down to what’s necessary for an ACF component, and rebuild our barebone code to see if all still works fine. And if it does we can call it a day – because we have already made good progress on our project, and we have earned a nice summer’s day at the beach before things get serious (again).
On Day 5, we turn our project into an RSC Service and publish that service via the Service Manager to make it available to other components on the PLCnext Control. We use CMake to link the RSC Service to the paho MQTT client library. To understand the methods that our RSC Service will expose, we refer to the paho MQTT client documentation that you can find in the Eclipse paho documentation.
This episode will take a while so better prepare yourself with a cold or hot drink and some sweets.
On Day 6, we won’t be looking at any code. Instead of that we will just look at some of the more interesting design elements that were used when completing the MQTT client for PLCnext Control.
We’re not finished yet, there’s a second task to do before we can use the component in our PLCnext Control. But cheer up – the hardest parts are already done, and today we will be home early.
On Day 7, we create a new RSC client component to provide a crucial functionality to our MQTT client for industrial automation purposes: sending and receiving data through the Global Data Space (GDS) of the PLCnext Technology.
For this we explain how the MqttGdsConnector component is made – source code is available at GitHub.
On Day 8, we add a Worker Thread to the MqttGdsConnector component that we created last time. That is because, unlike programs running on PLCnext Technology, a component cannot be scheduled on a cyclic ESM task. For this we explain what to put into the MqttGdsConnector component code, and where to do it. All source code is available at GitHub.
So that’s a quite short lesson today! Once you know how to let the WorkerThread do all the boring, repetetive work for you, you’re free to go and hang out with friends…
Assumed you’re interested in using WorkerThreads elsewhere in PLCnext programming, you might take a look at this C++ example in our GitHub CppExamples project, too.
On Day 9, we set up a JSON file based on an example schema for configuration of all MQTT related communication in our MqttGdsConnector component. There’s much to specify in our chatty component: What GDS variables are we reading? What topics are we publishing to, and on which MQTT Broker? And conversely, which topics have we subscribed to? And where do we write that incoming message data in the Global Data Space?
A JSON file is a convenient way to put settings into our code, and so we provide a suitable JSON schema and an example that uses two Open Source projects:
a JSON parser and a JSON validator. All the MQTT and GDS variable settings may change on occasion, so we better avoid a hard-coded path and name for the JSON file in our C++ code, and use another nice feature of our ACF configuration file. When we tell the PLCnext Runtime to create an instance of our component we can also pass in the path to a “settings” file and its name, which now would be those of our user configuration JSON file. Users could change this setting to point to whatever settings file they like in whatever location they want on the PLC.
All source code is available at GitHub.
On Day 10, we package our two components – the MqttClient RSC service and the MqttGdsConnector that uses the service – into a single Function Extension app. To deploy this app via the PLCnext Store, there are some further steps to go but you will see how convenient this way is for both the contributor and the user.
We walk you through the entire process of preparing, packaging, uploading the app, and afterwards installing the app like users will do, directly from the PLCnext Store to their PLC.
All-in-one playlist
Once started, the videos in this playlist will play one after the other.
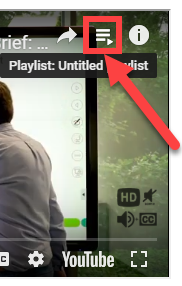
To choose a specific video in the playlist, do this:
- Click on the video to activate the YouTube embedding frame
- Click on the “list” icon at the upper edge (see picture)
- From the pop-up list, select a video
- Close the list at the “X” in the upper-right corner

You can also use YouTube to switch to fullscreen mode, show subtitles, or change the resolution.
Duration: 1h:09m


Leave a Reply
You must be logged in to post a comment.