Atvise is a powerful SCADA platform purely based on web technology. This means it will run good in any modern browser. With the use of HTML & JavaScript the Atvise Screens can be tailored to your needs. For more information on the Atvise product, I would like to point to their website.
Since PLCnext is Docker compatible, the Installation of Atvise is easy and Quick. This Makersblog Entry will show you how to install and license Atvise on your PLCnext control device.
Installation of Balena-Engine
The installation of the balena-engine is well described on the PLCnext GitHub community. Once you’ve successfully installed the engine continue to the next section.
Setting up the folder structure
The Atvise container will “use” some folders on the PLCnext controller. The structure will be created when the container start up the first time, but the access rights will be root, which makes coping the files in the next steps a lot harder. Creating the folder structure can easily be done in your favorite sFTP client, WinSCP for example.
Create the folders:
- /opt/plcnext/atvise/license
- /opt/plcnext/atvise/project

Downloading the Atvise image
The Atvise Image is compiled for the AXC F 1152 and AXC F 2152 (ARM) as well as for the AXC F 3152 and RFC 4072S (x86). The images were tested on the AXC F 2152 and AXC F 3152 but should work just fine for the AXC F 1152 and RFC 4072S. More info about the image can be found on the Docker Hub page.
To download the image, run the next command. (The correct image for your device will be provided)
balena-engine run -d -p 8080:80 -p 4841:4840 --name atvised --restart always -v /opt/plcnext/atvise/project/:/var/lib/atvise -v /opt/plcnext/atvise/license:/etc/atvise pxcbe/atvise
Setting up a license
To create a license on the Atvise website you need a Hardware code. This hardware code is provided in the file that can be found at opt/plcnext/atvise/license/licenseinfo.txt copy and paste this code. Go to the Atvise online portal and create a SCADA license for this HW Code. Download and place the atserver.lic (license file) in the same directory. With every account you get a trial license, so you can try it out without buying a license first.
Start and stop the container again with the next commands:
balena-engine stop atvised
balena-engine start atvised
If all went well, there the licenseinfo.txt should have a “1” in it, showing us that the license was accepted.

Connecting to the atserver and building your first project.
Download the “Atvise for Windows” of the webportal of Atvise. We don’t need the Atserver for Windows, but the Atvise Builder, which we do need comes with it. Install Atvise and start the Atvise Builder by searching for it in the windows searchbar.
Click: Builder, Connect to server and point to the IP adress of the controller, port 4841.
If you’ve connected successfully, you started your first project!
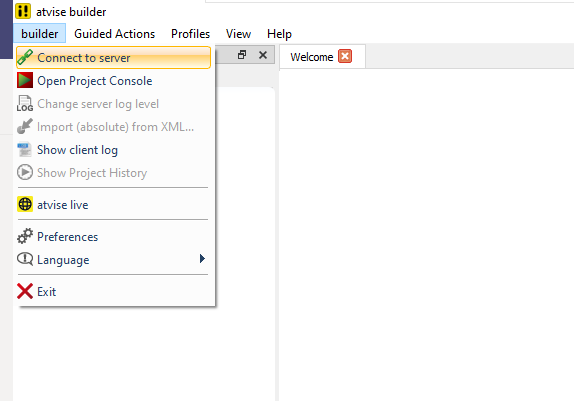
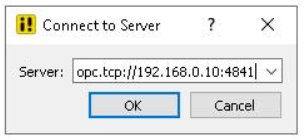
Connecting to a datasource (The PLCnext)
To get data from the PLCnext to the Atvise builder, we need to add a datasource in the Atvise project.
The correct settings of the datasource are shown in the pictures below.
Please change the source URL, and password in the security tab

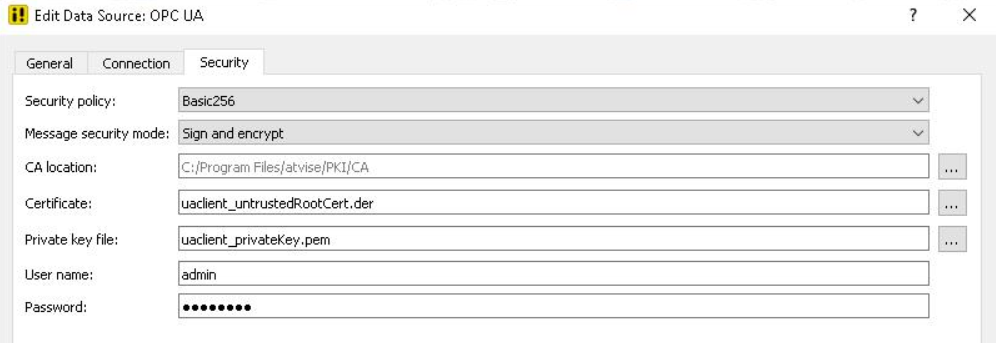
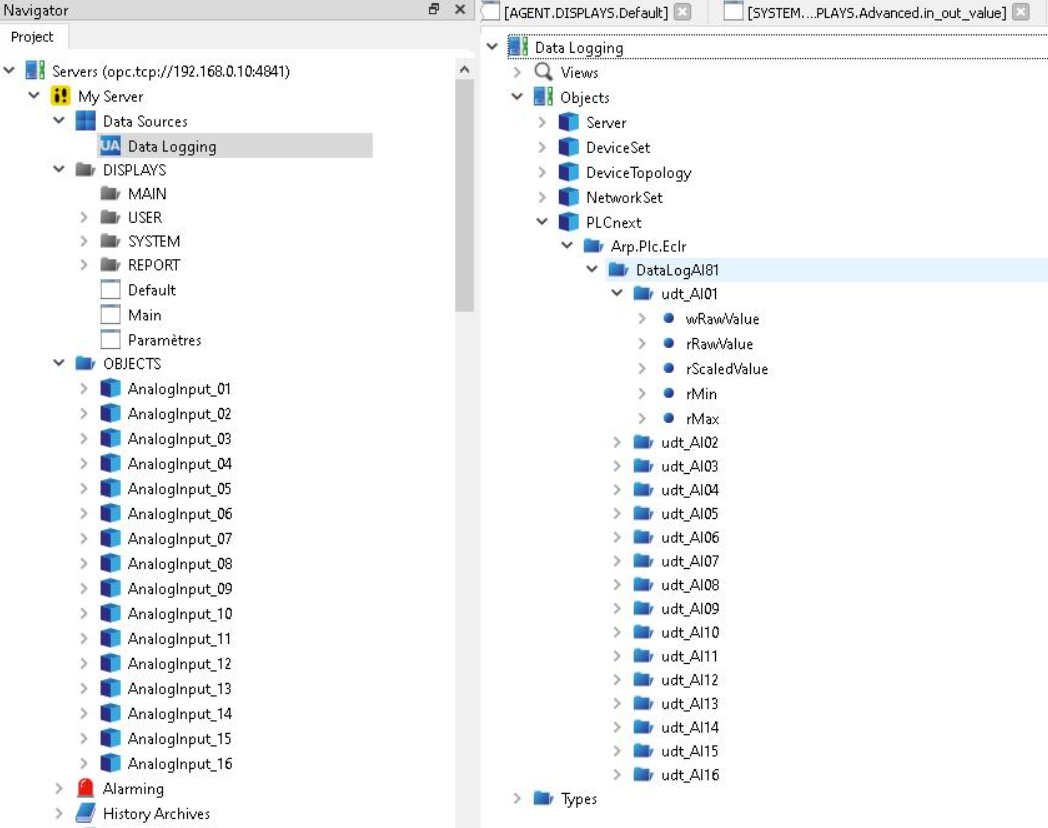
The data on the PLCnext embedded OPC UA server can now be used in your Atvise project.
Interested in a demo program?
Please contact axsupport@phoenixcontact.be
Troubleshoot:
Not enough rights to copy files to the /opt/plcnext/atvise folder and subfolders?
Probably they are owned by the root user. You can copy to /opt/plcnext/ and move the license with the command (as root)
mv /opt/plcnext/atserver.lic /opt/plcnext/atvise/license
You can also change the owner of the files to admin with
chown admin -R /opt/plcnext/atvise
No data on the OPC UA server?
Make sure you followed the right procedure to make the data available on the PLCnext embedded OPC UA server.
- Are the OPC flags marked for the datapoints you want to use?
- Are the visible variables set to “marked” on the OPC UA settings page in the PLANT (left side) of your PLCnext project?
Interested in a demo program?
Please contact axsupport@phoenixcontact.be
Further readings
More information of Atvise can be found on there website:
https://www.atvise.com/en/resources/videos
Info about Docker and “sharing folders”



Leave a Reply
You must be logged in to post a comment.