Configuration - SPLC
Available from firmware 2020.3 on RFC 4072S,
and from firmware 2021.9 on AXC F 2152 or AXC F 3152 in combination with AXC F XT SPLC 1000
The SPLC page provides access to the configuration of PROFIsafe® device settings on a controller.
Accessibility
|
This WBM page is accessible with user role:
|
How to get into the WBMHow to get into the WBM
Establishing a connection to the Web-based Management (WBM):
- Open a web browser on your computer.
- In the address field, enter the URL https://<IP-address-of-the-controller>/wbm,
for example: https://192.168.1.10/wbm.
For further information, see WBM.
SPLC page
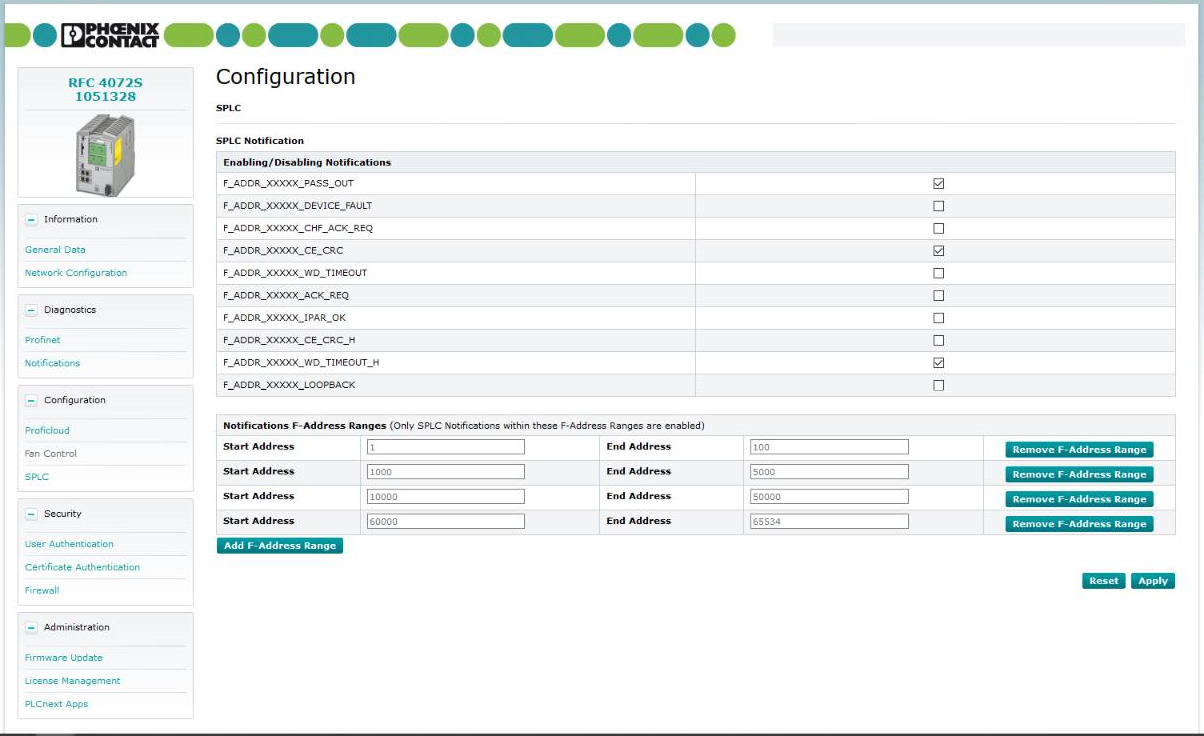
SPLC Notification section
PROFIsafe® provides comprehensive diagnostic mechanisms that are defined in the PROFIsafe® specification. For information on the PROFIsafe® specification, please refer to the User Manual for your controller or to www.profisafe.net.
On a safety-related PLCnext Control, such as RFC 4072S, the diagnostic messages for F-Devices are available via the Notification Manager that is implemented in the PLCnext Runtime System.
This page in the Web-based Management (WBM) is designed for your convenience in enabling or disabling notifications, and you can specify the F-Address Ranges the enabled notifications may use.
Enabling/Disabling Notifications
In this area, users can enable or disable the messaging of these PROFIsafe® notifications at their checkboxes.
By default, all notifications are disabled. Ticking a checkbox enables the respective notification.
Note: All changes will only be sent to the controller by pressing the button at the bottom right of the page. If you want start over or discard the changes you made before applying them to the controller, press the button.
| Notification | Meaning |
F_ADDR_XXXXX_PASS_OUT |
The PROFIsafe® device XXXXX has been passivated. |
F_ADDR_XXXXX_DEVICE_FAULT |
The PROFIsafe® device XXXXX reports an error. |
F_ADDR_XXXXX_CHF_ACK_REQ |
A channel error in the PROFIsafe® device XXXXX requests to be acknowledged. |
F_ADDR_XXXXX_CE_CRC |
A communication error from the PROFIsafe® device XXXXX deriving from the F_CE_CRC parameter[1] has occurred. |
F_ADDR_XXXXX_WD_TIMEOUT |
A communication error from the PROFIsafe® device XXXXX deriving from the F_WD_TIMEOUT parameter[2] has occurred. |
F_ADDR_XXXXX_ACK_REQ |
The PROFIsafe® device XXXXX demands an operator acknowledge request after fault clearance. |
F_ADDR_XXXXX_IPAR_OK |
The PROFIsafe® device XXXXX reports application of iParameter. |
F_ADDR_XXXXX_CE_CRC_H |
A communication error from the PROFIsafe® device XXXXX deriving from the F_CE_CRC_H parameter of the f-host driver has occurred. |
F_ADDR_XXXXX_WD_TIMEOUT_H |
A communication error from the PROFIsafe® device XXXXX deriving from the F_WD_TIMEOUT_H parameter of the f-host driver has occurred. |
F_ADDR_XXXXX_LOOPBACK |
A communication error from the PROFIsafe® device XXXXX deriving from a loopback check. |
- The parameter is set if at minimum one of these reasons applies:
- the PROFIsafe® device XXXXX detects a communication error based on a false CRC checksum
- an inconsistent parameterization between PROFIsafe® controller and the PROFIsafe® device XXXXX occurred
- a communication error between PROFIsafe® controller and the PROFIsafe® device XXXXX occurred
- The parameter is set when the PROFIsafe® device XXXXX detects a communication error based on exceeding the parameterized
F_WD_Time
For more information on the purpose of the corresponding PROFIsafe® parameters, please refer to the User Manual for your controller or to www.profisafe.net.
Notification F-Address Ranges
In the lower table section of this WBM page you may specify ranges of F-Addresses the notifications may use. By default, there are no entries in the table.
For adding a range of values, click the below the table and enter the new range (integer values from 1 to 65536). That may also be a single address, in which case you enter the same value into Start Address and End Address. You may add as much ranges as you want, there is no maximum to the count of entries in the ranges table.
For deleting a whole range of values, click the button at the respective row in the table.
Note: All changes will only be sent to the controller by pressing the button at the bottom right of the page. If you want start over or discard the changes you made before applying them to the controller, press the button.