Configuration - Web Services
Available from firmware 2021.0 LTS
Accessibility
|
This WBM page is accessible with user role:
|
How to get into the WBMHow to get into the WBM
Establishing a connection to the Web-based Management (WBM):
- Open a web browser on your computer.
- In the address field, enter the URL https://<IP-address-of-the-controller>/wbm,
for example: https://192.168.1.10/wbm.
For further information, see WBM.
Web Services page
The Web Services page provides access to the configuration of Web Services, e.g. HTTPS certificate used for nginx web server.
Note: Certificate settings
From firmware 2021.0 LTS
On the WBM Certificate Authentication page you can either select to use an existing IdentityStore or to use self-signed certificates.
- When using an existing
IdentityStorethe symbolic links are changed and refer now to the specifiedIdentityStore. - When using self-signed certificates a self-signed certificate is generated at /opt/plcnext/Security/IdentityStore/HTTPS-self-signed/*.* and the symbolic links refer to that
IdentityStore. - When creating a self-signed certificate via the Certificate Authentication WBM page, the /opt/plcnext/Security/IdentityStores/HTTPS-self-signed-Backup directory is not modified.
Show info for earlier firmware versionsShow info for earlier firmware versions
Up to firmware 2020.6
The HTTPS certificate and its related private key are located as files in the following directories of the controller file system:
- /opt/plcnext/Security/Certificates/https/https_cert.pem
- /opt/plcnext/Security/Certificates/https/https_key.pem
You can exchange these files for your own certificate and key.
When updating the firmware to 2021.0 LTS or newer, the pre-existing certificate file and key file are moved to /opt/plcnext/Security/IdentityStores/HTTPS-self-signed-Backup/*.*, and symbolic links are created at the original location pointing to those backup files.
nginx Web server
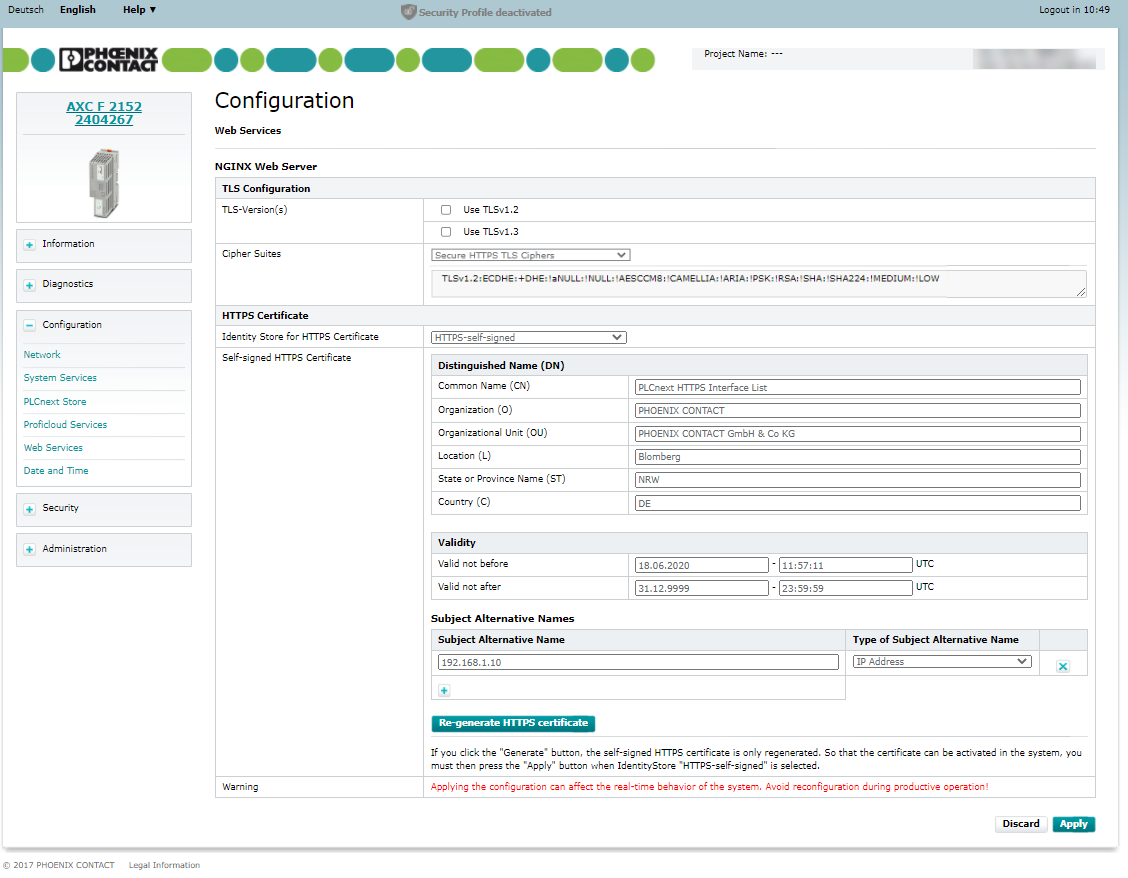
You can either select an HTTPS certificate of an Identity Store from the selection field or let the controller create a self-signed certificate by choosing HTTPS-self-signed. From firmware version 2022.6 you have to choose one or more TLS versions as well as a cipher suite set from the list.
Applying the configuration may affect the real-time behavior of the system.
Operated stations may show a delay which can cause crashes.
Avoid reconfiguring the Web Services during productive operation.
TLS configuration
Available from firmware 2022.6
Perform TLS configuration using the following options:
- Check TLSv1.3 to be used for nginx configuration.
- Do not check TLSv1.2 in addition.
- Select a predefined cipher suite to be used for nginx configuration.
- Click in the lower-left corner of the screen to activate the configuration on the controller.


- If you cannot set TLS version TLSv1.3, set TLS Version TLSv1.2.
- If you set TLS version TLSv1.2, you must set Secure HTTPS TLS Ciphers as the cipher suite.
- If the target browsers your audience will use does not support the secure cipher suite, set the Default HTTPS TLS Ciphers, but be aware that this is not considered a secure approach.
HTTPS certificate
The HTTPS certificate is used by the PLCnext web server to authenticate the controller towards the browser. The certificate is also valid for the HMI.
In the configuration table for the nginx web server you have the possibility to select the HTTPS certificate from one of the Identity Stores stored on the controller.
- Select an Identity Store in the selection field. The corresponding HTTPS certificate is applied.
- To apply the configuration to the system, click .
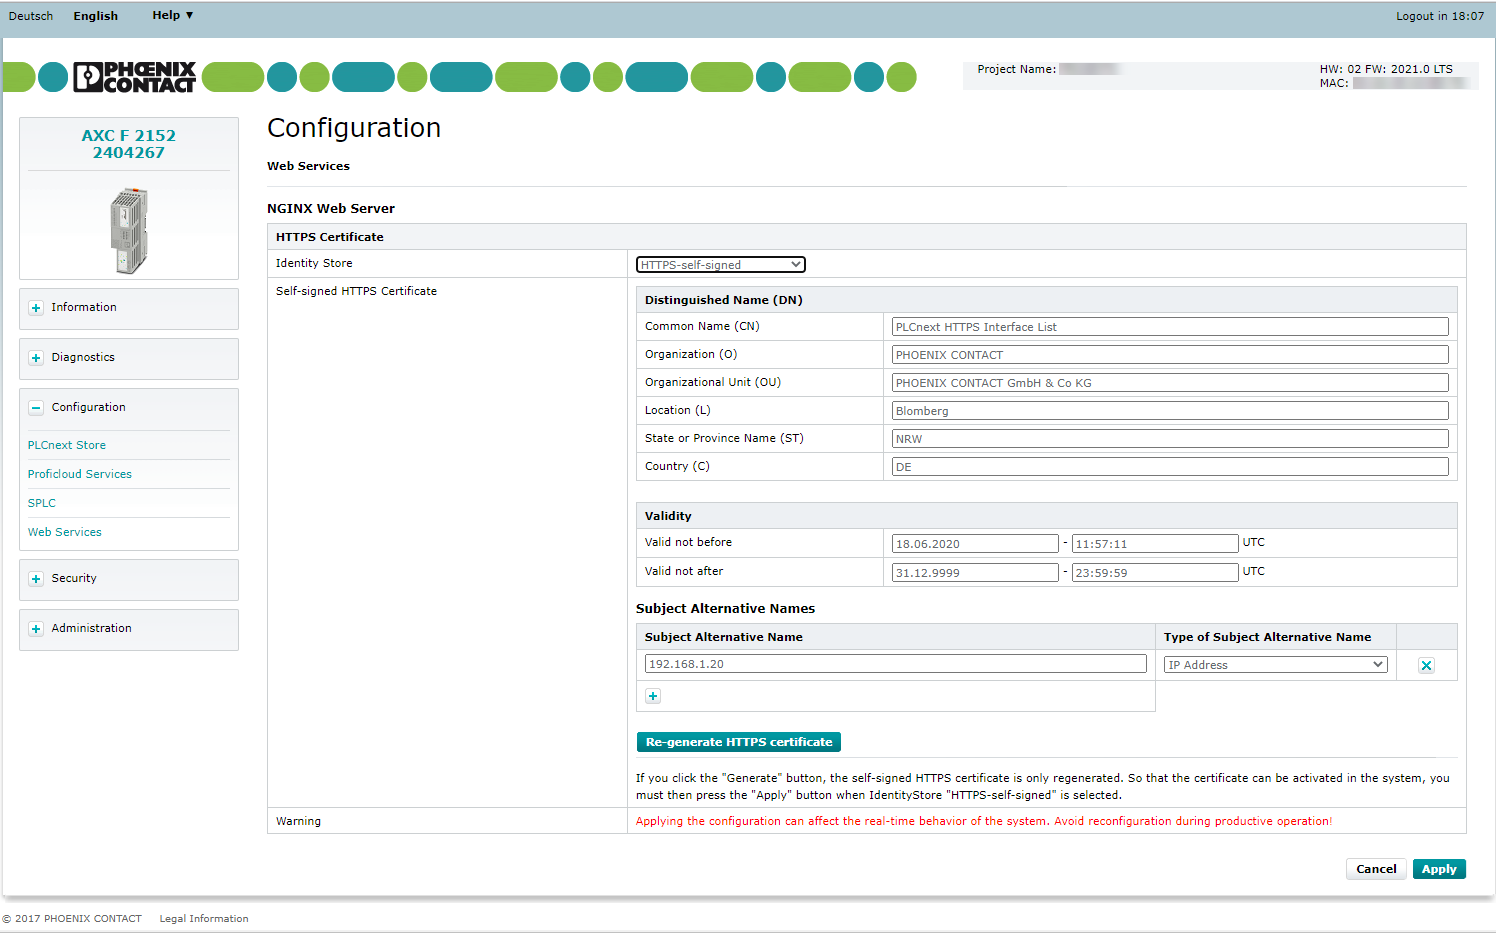
HTTPS certificate HTTPS-self-signed
In addition to the HTTPS certificates of the Identity Stores stored on the controller, you also have the possibility to select a self-signed certificate created by the firmware.
- If you want to use the HTTPS certificate generated by the firmware for the nginx configuration, select HTTPS-self-signed in the selection field.

Up to firmware 2022.3Up to firmware 2022.3

The current configuration of the self-signed HTTPS certificate is shown in the following table. You can adjust this configuration and regenerate the certificate to apply the changes in the configuration. The following configuration options are available:
Distinguished Name (Dn)
You can configure the following DN attributes:
- Common Name (CN)
- Organization (O)
- Organizational Unit (OU)
- Location (L)
- State or Province Name (ST)
- Country Name (C)
Validity of the certificate
- Valid not before: Date in format
DD.MM.YYYY - hh:mm:ss(if the input field remains empty, the current date of the controller is used) - Valid not after: Date in format
DD.MM.YYYY - hh:mm:ss(if the input field remains empty the date point31.12.9999 - 23:59:59is used)
Subject Alternative Names
The IP addresses from the network configuration of the controller are suggested by default. You have the possibility to extend or adjust them.
- Subject Alternative Name: Enter an IP address or DNS name (depending on the setting in the Type of Subject Alternative Name)
- Type of Subject Alternative Name: Select the type of the subject alternative name from the drop-down list.
Use the ![]() button to add more subject alternative names to the table (the table can also be empty).
button to add more subject alternative names to the table (the table can also be empty).
Use the  button to remove an element from the table.
Note: If the web server is to be accessible via different IP addresses of the interfaces without error message, all IP addresses must be entered as Subject Alternative Name of type IP address (e.g. for controllers with more than one Ethernet adapter). If the controller is also accessible via DNS names, these must also be entered.
Generate HTTPS certificate with changed configuration
Applying the configuration may affect the real-time behavior of the system.
Operated stations may show a delay which can cause crashes.
Avoid reconfiguring the Web Services during productive operation.
If you have changed the configuration of the HTTPS self-signed certificate, you need to regenerate the certificate to apply the changes. Note: If IP addresses or DNS names are changed, the configuration of the self-signed certificate must also be adjusted and regenerated.
- Click .
The certificate is regenerated. An already existing self-signed certificate will be overwritten.
- In order for the newly generated certificate to be directly applied to the nginx configuration, click .
The nginx configuration is reloaded with the updated certificate.
Related Topics