Creating a PLCnext Engineer HMI application
General information
In PLCnext Engineer, you can create an HMI application with which you can visualize, monitor and control your application on your controller.
A PLCnext Engineer HMI application contains one or more HMI pages with standard HMI objects or predefined HMI symbols that are assigned to HMI tags. The HMI tags are used to exchange data between the PLCnext Engineer HMI application and the controller.
An HMI tag is comparable to an HMI-internal variable. Each HMI tag needs to be assigned to a global variable created in the project. This assignment enables the PLCnext Engineer HMI application to access the global variables.
The data of the HMI application are automatically saved as project data. The HMI application is part of the project. If a project is transferred to the controller, the HMI application is transferred simultaneously (see Transferring a project to the controller). In addition to the application logic and configuration and parameterization data, the project includes all relevant HMI data. When using the web server of your controller, the HMI application can be executed via a standard browser, enabling processes running on the controller to be monitored and controlled.
Requirement for a PLCnext Engineer HMI application:
You need a finished project for a PLCnext Engineer HMI application. Observe the information in Creating a new project.
(German versions: PLCnext Engineer - HMI e-learning class and Schnelleinstieg).
Assigning HMI tags
Each HMI tag must be assigned to a global variable. To do this, proceed as follows:
- Click on the PLC node in the PLANT area.
The editor group of the / PLC controller opens.
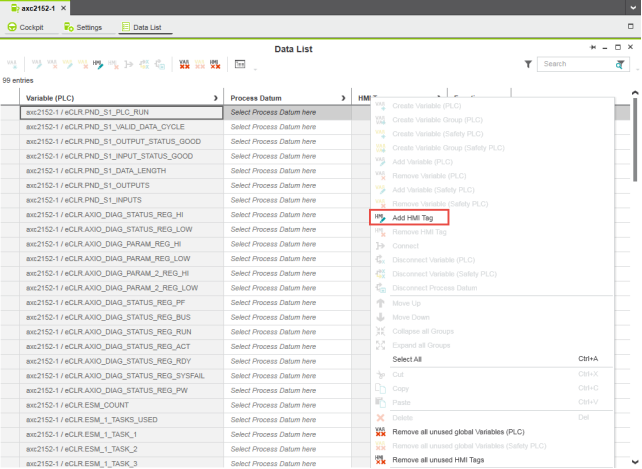
- Select the Data List editor.
In the Data List editor, you can see an overview of all variables available in the project.
- In the HMI column, right-click into the input field in the row of the variable to be visualized.
- In the context menu, select Add HMI Tag.

The HMI tag is created automatically. The name of the HMI tag is derived from that of the associated variable.
- Proceed as described for other variables.
Adding an HMI page
Proceed as follows to add an HMI page:
- Right-click the HMI Webserver node in the PLANT area.
- In the context menu, select Add HMI Page.
A new HMI page is added below the HMI Webserver node.
- Proceed as described for all HMI pages required.
Note: Each HMI page can be assigned its own name. To do so, select the corresponding HMI page in the PLANT area, press F2 and enter the desired name.
Setting an HMI page as start page
Proceed as follows to set an HMI page as start page:
- In the PLANT area, right-click the HMI page you want to set as start page.
- In the context menu, select the Set HMI Page as Startup entry.
User interface of the HMI page editor
The user interface of an HMI page editor offers additional functions. An HMI page editor includes a subeditor with an additional editor group. The Settings and Dynamics subeditors are shown in the example.

Designing HMI pages
Once you have added an HMI page, you can design the HMI page according to your application requirements by inserting objects. Proceed as follows to insert objects:
- Click on HMI in the COMPONENT area.
- Insert the desired object by drag and drop into the HMI page.
In the subeditor, you can configure the inserted object. Observe the information in the online help for PLCnext Engineer.
In the Dynamics subeditor, dynamics can be added to the object, which means that you can change the behavior of the object.
Process data assignment
Once you have designed an HMI page, you need to assign process data to the inserted elements. To do this, proceed as follows:
- Select the corresponding element in the Main editor.
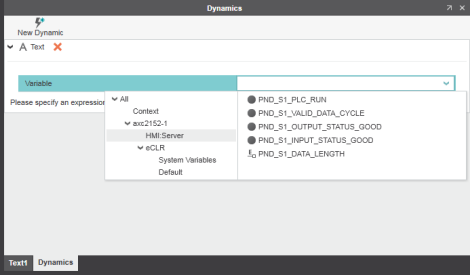
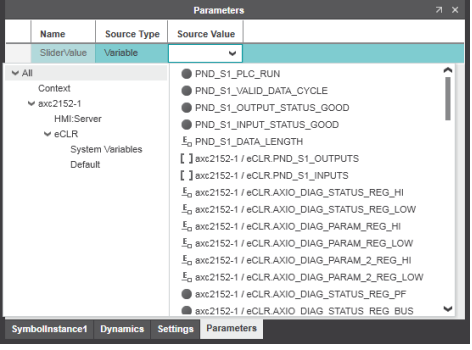
- Select the Dynamics subeditor (for objects) or Parameters subeditor (for symbols).
For objects:
- In the Dynamics subeditor, click into the input field next to Variable.
The role picker opens.
- Select the relevant process data item.

For symbols:
- In the Parameters subeditor, click in the input field of the Source Value column.
The role picker opens.
- Select the relevant process data item.

- Proceed as described for all inserted elements.
Transferring the project image to the controller
Proceed as described in Transferring a project to the controller.
Executing the PLCnext Engineer HMI application
To execute the PLCnext Engineer HMI application, proceed as follows:
- Click on the controller node in the PLANT area.
The editor group of the controller opens.
- Select the Cockpit editor.
- Click on the
 button (launches default browser to display your HMI pages).
The start page of the PLCnext Engineer HMI application opens in your default browser.